Etiqueta: base de datos
Generar clases .NET desde SQL
Clases entidad en base a tablas SQL
declare @TableName sysname = 'TableName'
declare @Result varchar(max) = 'public class ' + @TableName + '
{'

select @Result = @Result + '
    public ' + ColumnType + NullableSign + ' ' + ColumnName + ' { get; set; }
'
from
(
    select
        replace(col.name, ' ', '_') ColumnName,
        column_id ColumnId,
        case typ.name
            when 'bigint' then 'long'
            when 'binary' then 'byte[]'
            when 'bit' then 'bool'
            when 'char' then 'string'
            when 'date' then 'DateTime'
            when 'datetime' then 'DateTime'
            when 'datetime2' then 'DateTime'
            when 'datetimeoffset' then 'DateTimeOffset'
            when 'decimal' then 'decimal'
            when 'float' then 'float'
            when 'image' then 'byte[]'
            when 'int' then 'int'
            when 'money' then 'decimal'
            when 'nchar' then 'string'
            when 'ntext' then 'string'
            when 'numeric' then 'decimal'
            when 'nvarchar' then 'string'
            when 'real' then 'double'
            when 'smalldatetime' then 'DateTime'
            when 'smallint' then 'short'
            when 'smallmoney' then 'decimal'
            when 'text' then 'string'
            when 'time' then 'TimeSpan'
            when 'timestamp' then 'DateTime'
            when 'tinyint' then 'byte'
            when 'uniqueidentifier' then 'Guid'
            when 'varbinary' then 'byte[]'
            when 'varchar' then 'string'
            else 'UNKNOWN_' + typ.name
        end ColumnType,
        case
            when col.is_nullable = 1 and typ.name in ('bigint', 'bit', 'date', 'datetime', 'datetime2', 'datetimeoffset', 'decimal', 'float', 'int', 'money', 'numeric', 'real', 'smalldatetime', 'smallint', 'smallmoney', 'time', 'tinyint', 'uniqueidentifier')
            then '?'
            else ''
        end NullableSign
    from sys.columns col
        join sys.types typ on
            col.system_type_id = typ.system_type_id AND col.user_type_id = typ.user_type_id
    where object_id = object_id(@TableName)
) t
order by ColumnId

set @Result = @Result  + '
}'

print @Result
Generar objectos c# para DAO
declare @TableName sysname = 'NotaEntradaDetalle'
declare @Result varchar(max) = ''

select @Result = @Result + '
        ocomando.Parameters.Add("@' + [ColumnName] + '", SqlDbType.' + ColumnType + ').Value=pItems.' + [ColumnName] + ';'
from
(
    select
        replace(col.name, ' ', '_') ColumnName,
        column_id ColumnId,
        case typ.name
            when 'bigint' then 'BigInt'
            when 'binary' then 'Binary'
            when 'bit' then 'Bit'
            when 'char' then 'Char'
            when 'date' then 'DateTime'
            when 'datetime' then 'DateTime'
            when 'datetime2' then 'DateTime'
            when 'datetimeoffset' then 'DateTimeOffset'
            when 'decimal' then 'Decimal'
            when 'float' then 'Float'
            when 'image' then 'Image'
            when 'int' then 'Int'
            when 'money' then 'Money'
            when 'nchar' then 'NChar'
            when 'ntext' then 'NText'
            when 'numeric' then 'decimal'
            when 'nvarchar' then 'string'
            when 'real' then 'double'
            when 'smalldatetime' then 'DateTime'
            when 'smallint' then 'short'
            when 'smallmoney' then 'decimal'
            when 'text' then 'string'
            when 'time' then 'TimeSpan'
            when 'timestamp' then 'DateTime'
            when 'tinyint' then 'byte'
            when 'uniqueidentifier' then 'Guid'
            when 'varbinary' then 'byte[]'
            when 'varchar' then 'VarChar'
            else 'UNKNOWN_' + typ.name
        end ColumnType,
        case
            when col.is_nullable = 1 and typ.name in ('bigint', 'bit', 'date', 'datetime', 'datetime2', 'datetimeoffset', 'decimal', 'float', 'int', 'money', 'numeric', 'real', 'smalldatetime', 'smallint', 'smallmoney', 'time', 'tinyint', 'uniqueidentifier')
            then '?'
            else ''
        end NullableSign
    from sys.columns col
        join sys.types typ on
            col.system_type_id = typ.system_type_id AND col.user_type_id = typ.user_type_id
    where object_id = object_id(@TableName)
) t
order by ColumnId

set @Result = @Result  + ''

print @Result
Generando codigo para el reader
declare @TableName sysname = 'NotaEntradaDetalle'
declare @Result varchar(max) = ''

select @Result = @Result + '
        objBE.' + [ColumnName] + '=(' + ColumnType + ')oDataReader["' + [ColumnName] + '"];'
from
(
    select
        replace(col.name, ' ', '_') ColumnName,
        column_id ColumnId,
        case typ.name
            when 'bigint' then 'long'
            when 'binary' then 'byte[]'
            when 'bit' then 'bool'
            when 'char' then 'string'
            when 'date' then 'DateTime'
            when 'datetime' then 'DateTime'
            when 'datetime2' then 'DateTime'
            when 'datetimeoffset' then 'DateTimeOffset'
            when 'decimal' then 'decimal'
            when 'float' then 'float'
            when 'image' then 'byte[]'
            when 'int' then 'int'
            when 'money' then 'decimal'
            when 'nchar' then 'string'
            when 'ntext' then 'string'
            when 'numeric' then 'decimal'
            when 'nvarchar' then 'string'
            when 'real' then 'double'
            when 'smalldatetime' then 'DateTime'
            when 'smallint' then 'short'
            when 'smallmoney' then 'decimal'
            when 'text' then 'string'
            when 'time' then 'TimeSpan'
            when 'timestamp' then 'DateTime'
            when 'tinyint' then 'byte'
            when 'uniqueidentifier' then 'Guid'
            when 'varbinary' then 'byte[]'
            when 'varchar' then 'string'
            else 'UNKNOWN_' + typ.name
        end ColumnType,
        case
            when col.is_nullable = 1 and typ.name in ('bigint', 'bit', 'date', 'datetime', 'datetime2', 'datetimeoffset', 'decimal', 'float', 'int', 'money', 'numeric', 'real', 'smalldatetime', 'smallint', 'smallmoney', 'time', 'tinyint', 'uniqueidentifier')
            then '?'
            else ''
        end NullableSign
    from sys.columns col
        join sys.types typ on
            col.system_type_id = typ.system_type_id AND col.user_type_id = typ.user_type_id
    where object_id = object_id(@TableName)
) t
order by ColumnId

set @Result = @Result  + ''

print @Result
Eliminar log de transacciones sql server 2008 r2
ALTER DATABASE [DASHBOARD]
SET RECOVERY SIMPLE;
GO
DBCC SHRINKFILE(DASHBOARD_log,1)
GO
ALTER DATABASE [DASHBOARD]
SET RECOVERY FULL
GO
Informacion de una base de datos
Query para obtener informacion sobre estado y uso de una base de datos
EXEC sp_helpdb DASHBOARD
Listar procedimientos almacenados creados o modificados
DECLARE @x [int]
SET @x=30
SELECT [name] FROM [sys].[objects] WHERE [type]=’P’ AND DATEDIFF(d,[create_date], GETDATE()) < @x
SELECT [name] FROM [sys].[objects] WHERE [type]=’P’ AND DATEDIFF(d,[modify_date], GETDATE()) < @x
Solucionar bloqueo de tablas en SQL SERVER
El sistema ERP de la empresa no podia ingresar a una opcion de la aplicacion. Esta devolvía un error por timeout de SQL.
Se solucionó bajando el proceso que hacia que se bloquee la tabla
Con el siguiente script se visualizó el bloqueo (no aparecia el bloqueo en otros metodos consultados en internet)
SELECT request_session_id sessionid,
 resource_type type,
 resource_database_id dbid,
 OBJECT_NAME(resource_associated_entity_id, resource_database_id) objectname,
 request_mode rmode,
 request_status rstatus
FROM sys.dm_tran_locks
WHERE resource_type IN ('DATABASE', 'OBJECT')
Tambien con esta consulta
EXECUTE sp_lock
Finalmente con el comando kill (ssid) se bajó el proceso conflictivo.
Se revisaron ademas las siguientes opciones
http://microsoftsqlsecret.fullblog.com.ar/detectar-bloqueos-sql-server-v2005-y-superiores.html
http://www.eklectopia.com/consultar-tablas-bloqueadas-en-sql-server-el-misterioso-caso-del-select/
http://www.sql-server-performance.com/2007/performance-monitor-general/
http://programacion-x.blogspot.pe/2012/07/como-identificar-bloqueos-en-sql-server.html
Configurar Correos SQL 2008 R2
Contents
- Introduction
- Configure Database Mail – (Database Mail Configuration Wizard)
- Configure Database Mail – (Transact-SQL)
- Handling Security in Database Mail
- Send E-Mail from Database Mail
- Managing Database Mail
- About the Author
Introduction
This article describes how to configure, test, and manage Database Mail in SQL Server 2008 R2. Database Mail was first introduced as a new feature in SQL Server 2005 and replaces the SQL Mail feature found in previous versions.
Database Mail is a SQL Server component that provides developers and administrators with an enterprise solution for sending e-mail messages from the SQL Server Database Engine. While the primary use of Database Mail is to send alert messages to administrators, it can also be used to send the results of a query to end users, use it in Transact-SQL code, or even include file attachments from any available resource on the network.
Database Mail versus SQL Mail
As previously mentioned, database Mail was first introduced as a new feature in SQL Server 2005 and replaces the SQL Mail feature found in previous versions. SQL Mail is still retained in SQL Server 2005 and SQL Server 2008 for backwards compatibility meaning that the SQL Server Agent can still use both SQL Mail and the new Database Mail feature (recommended) to send e-mail messages.
SQL Mail was designed to utilize an Extended Messaging Application Programming Interface (Extended MAPI) to send e-mail notifications. This required users to install and configure an e-mail application (such as Outlook) that supported the Extended MAPI communication protocol on the computer that is running SQL Server. Database Mail, on the other hand, has no such requirement as it utilizes the Simple Mail Transfer Protocol (SMTP) instead of Extended MAPI to send mail. Database Mail not only simplifies email setup, but has many other benefits over SQL Mail, including the following:
- There is no requirement that an email client be installed on the SQL Server machine.
- Email is queued for later delivery if the mail server stops or fails.
- Multiple SMTP servers can be specified so that mail continues to be delivered in the event that one of the SMTP servers stops.
- Database Mail is cluster aware.
Receiving Email
The Database Mail feature is used to send e-mail messages from the SQL Server Database Engine. The only way to receive e-mail messages in SQL Server 2008 is by using the legacy stored procedures like sp_processmail found in SQL Mail. Because there is no IMAP or POP3 support, Database Mail does not support receiving incoming e-mail messages. Receiving e-mail can present a security risk to the database server through the use of Denial-Of-Service (DOS) attacks or messages that contain harmful Transact-SQL likeDROP DATABASE.
Configure Database Mail – (Database Mail Configuration Wizard)
Before using Database Mail, several configuration tasks need to be carried out. This section describes the steps necessary to successfully configure Database Mail which includes verifying that the SQL Server Agent is running, verifying that the Service Broker is enabled for the msdb database, enabling the Database Mail feature, and finally, creating an e-mail Profile and SMTP mail account using the Database Mail Configuration Wizard.
Verify SQL Server Agent is Running
Messages in Database Mail are sent by the SQL Server Agent. If the Agent is not running, the messages will be accumulated in the msdb database and sent when the Agent service gets started again.
Use the master..xp_servicecontrol system stored procedure to check the status of the SQL Server Agent process. If the Agent is stopped, you will want to start it in order to send messages through Database Mail.
USE master Go EXEC xp_servicecontrol N'QueryState', N'SQLServerAGENT'; Go Current Service State --------------------- Running. |
Verify Service Broker is Enabled for the msdb Database
Database Mail relies on Service Broker for queuing e-mail messages. If Database Mail is stopped or if Service Broker message delivery is not activated in the msdb database, Database Mail queues messages in the database but cannot deliver the messages. In this case, the Service Broker messages remain in the Service Broker Mail queue. Service Broker does not activate the external program, so there are no log entries in sysmail_event_log and no updates to the item status in sysmail_allitems and the related views.
Verify that Service Broker is enabled for the msdb database by running the following query.
USE master Go SELECT is_broker_enabled FROM sys.databases WHERE database_id = DB_ID(N'msdb'); Go is_broker_enabled ----------------- 1 |
is_broker_enabled will be 1 if Service Broker is enabled for the given database (msdb), otherwise it will be 0.
If the Service Broker is disabled (is_broker_enabled = 0), run the following T-SQL to enable Service Broker for the msdb database:
USE master Go ALTER DATABASE msdb SET ENABLE_BROKER WITH ROLLBACK IMMEDIATE; Go |
Enable Database Mail
Database Mail relies on a number of internal stored procedures. To reduce the surface area, these stored procedures are disabled on new installations of SQL Server which makes Database Mail not active by default. Users must explicitly enable these Database Mail stored procedures by using either one of the the following three methods.
- sp_configure Stored Procedure
To enable Database Mail using the sp_configure stored procedure, run the following.
USE master
Go

EXEC sp_configure 'show advanced options', 1
Go

Configuration option 'show advanced options' changed from 0 to 1. Run the RECONFIGURE statement to install.

RECONFIGURE
Go

Command(s) completed successfully.

EXEC sp_configure 'Database Mail XPs', 1
Go

Configuration option 'Database Mail XPs' changed from 0 to 1. Run the RECONFIGURE statement to install.

RECONFIGURE
Go

Command(s) completed successfully.

EXEC sp_configure 'show advanced options', 0
Go

Configuration option 'show advanced options' changed from 1 to 0. Run the RECONFIGURE statement to install.

RECONFIGURE
Go
- Surface Area Configuration Facet of Policy-Based Management
To enable Database Mail using the Surface Area Configuration Facet of Policy-Based Management, launch SQL Server Management Studio, right-click on the server that you intend to enable the Database Mail feature for and select Facets.
 Open Facets Dialog Box for Server
On the Facets dialog box, select Surface Area Configuration from the Facet drop down list.
 Select the Surface Area Configuration Facet
Locate DatabaseMailEnabled in the Facet properties section and change its value from False to True and then click the Ok button.
 Enable Database Mail Feature
 - Database Mail Configuration Wizard
The third method that can be used to enable the Database Mail feature is to do nothing here and wait until you run the Database Mail Configuration Wizard (next section). The Database Mail Configuration Wizard is used to create e-mail Profiles and SMTP Accounts; both of which are required in order to use Database Mail to send messages. If the Database Mail feature in not enabled, the Database Mail Configuration Wizard will prompt you to enable it when attempting to create the e-mail Profile and SMTP account.
 Enable Database Mail through the Database Mail Configuration Wizard
Create E-Mail Profile and SMTP Account
After enabling the Database Mail feature, the next step is to use the Database Mail Configuration Wizard to create an e-mail Profile and an SMTP Account through which to send emails. To start the Database Mail Configuration Wizard, in Object Explorer, expand theManagement folder in SQL Server Management Studio, right-click Database Mail, and select Configure Database Mail.
 |
|
|
Launch Database Mail Configuration Wizard
|
|
This will bring up the Database Mail Configuration Wizard welcome screen. Click Next to continue.
On the Select Configuration Task screen, select Set up Database Mail by performing the following tasks:. Click Next to continue.
If you haven’t previously enabled Database Mail then you will receive a message box asking if you wish to enable the Database Mail feature. Click Yes to enable it.
 |
|
|
Enable Database Mail
|
|
Next, on the New Profile screen, provide an e-mail Profile Name and an optional description of the profile, then select the Add button to configure an SMTP Account.
On the New Database Mail Account screen, provide the required information for the outgoing mail server (SMTP). Fill in the Account Name, Description (optional), Email Address, Display name, Reply Email (optional), and SMTP Server Name and Port number. Then select the appropriate SMTP authentication for your server and click Next to continue.
This will return you to the New Profile screen. Click Next to continue.
The Manage Profile Security screen allows you to set this profile as either public or private. A private profile is accessible only to specific users or roles. A public profile allows any user or role with access to the mail host database (msdb) to send e-mail using this profile. Note that in order to send Database Mail, users must also be a added to the DatabaseMailUsersRole database role in the msdb database.
You can also specify that this profile is a default profile. In this case, users or roles can send e-mail using the profile without explicitly specifying the profile name. If the user or role sending the e-mail message has a default private profile (use the Private Profiles tab on this screen), Database Mail uses that profile. If the user or role has no default private profile, sp_send_dbmail uses the default public profile for the msdb database. If there is no default private profile for the user or role and no default public profile for the database,sp_send_dbmail returns an error. Only one profile can be marked as the default profile.
Click Next to continue.
Use the Configure System Parameters screen to specify Database Mail system parameters such as retry attempts or types of attachments that you do not want to send out by including the extensions of the files (Prohibited Attachment File Extensions). Click Next to continue.
Finally, review the list of steps the wizard is about to perform, and then click Finish to execute these actions.
Verify that all actions completed successfully. Click Close to exit the Database Mail Configuration Wizard.
Perform a quick test of the new e-mail Profile within SQL Server Management Studio. Right-click Database Mail and select Send Test E-Mail….
 |
|
|
Send Test E-Mail
|
|
Supply a recipient email address and click Send Test E-Mail.
 |
|
|
Supply Recipient Email Address
|
|
Check that you received the test email and click Ok to close the dialog box; otherwise click the Troubleshoot button to investigate any errors. In addition to the Troubleshooting button, you can also review the contents of msdb.dbo.sysmail_event_log.
SELECT * FROM msdb.dbo.sysmail_event_log; Go |
 |
|
|
Verify Email was Sent and Received
|
|
Configure Database Mail – (Transact-SQL)
The previous section included detailed instructions for setting up Database Mail using the Database Mail Configuration Wizard. Database Mail can also be configured using Transact-SQL (Database Mail stored procedures) to create profiles and accounts.
To create a Database Mail profile using Transact-SQL:
- Create one or more Database Mail accounts for the profile using the msdb.dbo.sysmail_add_account_sp stored procedure.
- Execute the stored procedure msdb.dbo.sysmail_add_profile_sp to create the profile, specifying:
- The name of the profile to create.
- An optional description of the profile.
- For each account, execute msdb.dbo.sysmail_add_profileaccount_sp to add the account to the profile.
- For each database role or user that will send mail using this profile, grant access to the profile by executing msdb.sysmail_add_principalprofile_sp (next section).
Example
The following example creates a Database Mail account and a Database Mail profile using Transact-SQL. The example then adds the account to the profile. Granting access to the profile to the AppUser database user will be performed in the section «Handling Security in Database Mail«.
-- Create a Database Mail account EXEC msdb.dbo.sysmail_add_account_sp @account_name = 'iDevelopment SMTP Account' , @description = 'Administrative SMTP account for iDevelopment.info' , @email_address = 'dba@idevelopment.info' , @display_name = 'iDevelopment.info Database Support' , @replyto_address = 'dba@idevelopment.info' , @mailserver_type = 'SMTP' , @mailserver_name = 'relay.pair.com' , @port = 25 , @use_default_credentials = 0 , @username = 'jhunter' , @password = 'xxxxxxxx' Go -- Create a Database Mail profile EXEC msdb.dbo.sysmail_add_profile_sp @profile_name = 'iDevelopment.info Profile' , @description = 'Administrative profile for iDevelopment.info' Go -- Add the account to the profile EXEC msdb.dbo.sysmail_add_profileaccount_sp @profile_name = 'iDevelopment.info Profile' , @account_name = 'iDevelopment SMTP Account' , @sequence_number = 1 Go |
Handling Security in Database Mail
This section provides some helpful tips when configuring security in Database Mail. At the end of this section is an example T-SQL script that explains the necessary privileges required to use Database Mail.
The DatabaseMailUserRole Role
Database Mail is guarded by the database role DatabaseMailUserRole in the msdb database in order to prevent anyone from sending arbitrary emails. Database users or roles must be created in the msdb database and must also be a member ofDatabaseMailUserRole in order to send emails with the exception of sysadmin who has all privileges. For example, the following error message will be thrown if an unauthorized user attempts to send an e-mail message using sp_send_dbmail:
EXEC msdb.dbo.sp_send_dbmail @profile_name = 'iDevelopment.info Profile' , @recipients = 'dba@idevelopment.info' , @subject = 'Automated Test Results (Successful)' , @body = 'The stored procedure finished successfully.' Go Msg 229, Level 14, State 5, Procedure sp_send_dbmail, Line 1 The EXECUTE permission was denied on the object 'sp_send_dbmail', database 'msdb', schema 'dbo'. |
In addition to sp_send_dbmail, the following Database Mail stored procedures and views will be inaccessible if the user is not a member of DatabaseMailUserRole:
   sysmail_help_status_sp
   sysmail_delete_mailitems_sp
   sysmail_allitems
   sysmail_event_log
   sysmail_faileditems
   sysmail_mailattachments
   sysmail_sentitems
   sysmail_unsentitems
Profile Security
Execute permissions for sp_send_dbmail default to all members of the DatabaseMailUserRole database role in the msdb database. However, when the user sending the message does not have permission to use the profile for the request, sp_send_dbmail returns an error and does not send the message.
A database user or role must be granted permission to use a Database Mail profile if that profile is private. Since Database Mail enforces security for mail profiles, you must explicitly grant permissions to each msdb database user or role that should have access to a private Database Mail profile. You can grant access to either specific users or to all users in msdb. A private profile restricts access to a specified list of users or roles of the mail-host database (msdb). A public profile, on the other hand, allows any user or role with access to the mail host database (msdb) to send e-mail using that profile. The Database Mail profile used in this guide is a private profile and will therefore require permissions to be granted to a user or role before it can be used to send e-mail.
Create Example User for Database Mail
The following T-SQL creates a new login named [IDEVELOPMENT\AppUser] which will be used in this guide to demonstrate sending messages using Database Mail. AppUser is an Active Directory user who will be authenticated to SQL Server using Windows Authentication. In order to use Database Mail, a new user will be created in the msdb database and granted permission to connect for the AppUser login. As already mentioned in this section, the user must be a member of DatabaseMailUserRole in order to send e-mail messages which can be performed using sp_addrolemember. Next, since the Database Mail profile being used in this guide (iDevelopment.info Profile) is a private profile, the new user will need to be granted permissions before the profile can be used. This is performed using msdb.dbo.sysmail_add_principalprofile_sp. In the example below, I will also use @is_default = 1 when calling msdb.dbo.sysmail_add_principalprofile_sp so this profile will be the default private profile for the new user. Note that each user or role may have only one default profile. Finally, in order to access other database resources used in the guide, a new user will be created in the AppDB and AdventureWorks2008R2 user databases along with the required permissions.
USE [master] Go -- Create a login account to use Windows Authentication CREATE LOGIN [IDEVELOPMENT\AppUser] FROM WINDOWS WITH DEFAULT_DATABASE = [AppDB]; Go -------------------------------------------------------------- -- Create a user in the [msdb] database USE [msdb] Go CREATE USER [AppUser] FOR LOGIN [IDEVELOPMENT\AppUser]; Go GRANT CONNECT TO [AppUser]; Go -------------------------------------------------------------- USE [msdb] Go -- Add user to the Database Mail role EXEC sp_addrolemember @rolename = 'DatabaseMailUserRole' , @membername = 'AppUser'; Go -- Grants permission for a database user or role -- to use a private Database Mail profile EXEC msdb.dbo.sysmail_add_principalprofile_sp @profile_name = 'iDevelopment.info Profile' , @principal_name = 'AppUser' , @is_default = 1; Go -------------------------------------------------------------- -- Create a user in the [AppDB] database USE [AppDB] Go CREATE USER [AppUser] FOR LOGIN [IDEVELOPMENT\AppUser]; Go GRANT CONNECT TO [AppUser]; Go -------------------------------------------------------------- -- Create a user in the [AdventureWorks2008R2] database USE [AdventureWorks2008R2] Go CREATE USER [AppUser] FOR LOGIN [IDEVELOPMENT\AppUser]; Go GRANT CONNECT TO [AppUser]; Go GRANT SELECT ON AdventureWorks2008R2.Production.WorkOrder TO [AppUser]; Go GRANT SELECT ON AdventureWorks2008R2.Production.Product TO [AppUser]; Go |
Send E-Mail from Database Mail
This section provides several examples of how to send messages using Database Mail. The user sending the messages will be AppUser. This user has the necessary privileges to send messages from Database Mail as described in the section Handling Security in Database Mail.
The examples presented in this section assume that the Database Mail e-mail profile iDevelopment.info Profile has been created as demonstrated earlier in this guide. This profile tells Database Mail which account it should use to send e-mails. In each of the examples presented, I will be providing the @profile parameter to the sp_send_dbmail system procedure to include the iDevelopment.info Profile. When profile is not specified, sp_send_dbmail uses a default profile. If the user sending the e-mail message has a default private profile, Database Mail uses that profile. If the user has no default private profile, sp_send_dbmail uses the default public profile. If there is no default private profile for the user and no default public profile, sp_send_dbmail returns an error.
When sending messages, sp_send_dbmail does not support e-mail messages with no content. To send an e-mail message, you must specify at least one of @body, @query, @file_attachments, or @subject. Otherwise, sp_send_dbmail returns an error.
Send a Simple Text E-Mail Message
This example sends an e-mail message to the Database Administration Team using the e-mail address dba@idevelopment.info. The message has the subject 'Automated Test Results (Successful)'. The body of the message contains the text 'The stored procedure finished successfully.'. Notice that I can be connected to any database and that the sp_send_dbmail stored procedure is in the msdb database.
USE AppDB Go EXEC msdb.dbo.sp_send_dbmail @profile_name = 'iDevelopment.info Profile' , @recipients = 'dba@idevelopment.info' , @subject = 'Automated Test Results (Successful)' , @body = 'The stored procedure finished successfully.'; Go |
Send an E-Mail Message with the Results of a Query
This example sends an e-mail message to the Database Administration Team using the e-mail address dba@idevelopment.info. The message has the subject 'Work Order Count', and executes a query that shows the number of work orders with a DueDateless than two days after April 30, 2006. Database Mail attaches the result as a text file by using the @attach_query_result_as_file = 1 parameter.
USE AdventureWorks2008R2 Go EXEC msdb.dbo.sp_send_dbmail @profile_name = 'iDevelopment.info Profile' , @recipients = 'dba@idevelopment.info' , @subject = 'Work Order Count' , @query = 'SELECT COUNT(*) AS "Number of Work Orders" FROM AdventureWorks2008R2.Production.WorkOrder WHERE DueDate > ''2006-04-30'' AND DATEDIFF(dd, ''2006-04-30'', DueDate) < 2' , @attach_query_result_as_file = 1 , @query_attachment_filename = 'Work Order Count.txt'; Go |
- @query
The query parameter is of type nvarchar(max) and can contain any valid Transact-SQL statements. Because the query is actually executed in a separate session, local variables in the script calling sp_send_dbmail are not available to the query.
- @attach_query_result_as_file
Use attach_query_result_as_file to control whether the results of the query will be attached as a file, or included in the body of the e-mail message. attach_query_result_as_file is of type bit, with a default of 0. When the value is 0, the query results are included in the body of the e-mail message, after the contents of the @body parameter. When the value is 1, the results are returned as an attachment. This parameter is only applicable if @query is specified.
- @query_attachment_filename
query_attachment_filename specifies the file name to use for the result set of the query attachment. query_attachment_filename is of type nvarchar(255), with a default of NULL. This parameter is ignored when attach_query_result is 0. Whenattach_query_result is 1 and this parameter is NULL, Database Mail creates an arbitrary filename.
- @query_result_width
query_result_width is the line width, in characters, to use for formatting the results of the query. The query_result_width is of type int, with a default of 256. The value provided must be between 10 and 32767. This parameter is only applicable if@query is specified.
- @query_result_separator
query_result_separator is the character used to separate columns in the query output. The separator is of type char(1). Defaults to ' ' (space).
- @exclude_query_output
exclude_query_output specifies whether to return the output of the query execution in the e-mail message. exclude_query_output is bit, with a default of 0. When this parameter is 0, the execution of the sp_send_dbmail stored procedure prints the message returned as the result of the query execution on the console. When this parameter is 1, the execution of the sp_send_dbmail stored procedure does not print any of the query execution messages on the console.
- @append_query_error
append_query_error specifies whether to send the e-mail when an error returns from the query specified in the @query argument. append_query_error is bit, with a default of 0. When this parameter is 1, Database Mail sends the e-mail message and includes the query error message in the body of the e-mail message. When this parameter is 0, Database Mail does not send the e-mail message, and sp_send_dbmail ends with return code 1, indicating failure.
- @query_no_truncate
query_no_truncate specifies whether to execute the query with the option that avoids truncation of large variable length data types (varchar(max), nvarchar(max), varbinary(max), xml, text, ntext, image, and user-defined data types). When set, query results do not include column headers. The query_no_truncate value is of type bit. When the value is 0 or not specified, columns in the query truncate to 256 characters. When the value is 1, columns in the query are not truncated. This parameter defaults to 0.
- @query_result_no_padding
query_result_no_padding is of type bit. The default is 0. When you set to 1, the query results are not padded, possibly reducing the file size.If you set @query_result_no_padding to 1 and you set the @query_result_width parameter, the@query_result_no_padding parameter overwrites the @query_result_width parameter. In this case no error occurs. If you set the @query_result_no_padding to 1 and you set the @query_no_truncate parameter, an error is raised.
Send an HTML E-Mail Message
This example sends an e-mail message to the Database Administration Team using the e-mail address dba@idevelopment.info. The message has the subject 'Work Order List', and contains an HTML document that shows the work orders with a DueDateless than two days after April 30, 2006. Database Mail sends the message in HTML format using @body_format = 'HTML'. body_format is of type varchar(20) and specifies the format of the message body. Valid values are TEXT (default) and HTML. The default value is NULL which defaults to TEXT. When specified, the headers of the outgoing message are set to indicate that the message body has the specified format.
USE AdventureWorks2008R2 Go DECLARE @tableHTML NVARCHAR(MAX); SET @tableHTML = N'<h1>Work Order Report</h1>' + N'<table border="1">' + N'<tr><th>Work Order ID</th><th>Product ID</th>' + N'<th>Name</th><th>Order Qty</th><th>Due Date</th>' + N'<th>Expected Revenue</th></tr>' + CAST ( ( SELECT td = wo.WorkOrderID , '' , td = p.ProductID , '' , td = p.Name , '' , td = wo.OrderQty , '' , td = wo.DueDate , '' , td = (p.ListPrice - p.StandardCost) * wo.OrderQty FROM AdventureWorks2008R2.Production.WorkOrder AS wo JOIN AdventureWorks2008R2.Production.Product AS p ON wo.ProductID = p.ProductID WHERE DueDate > '2006-04-30' AND DATEDIFF(dd, '2006-04-30', DueDate) < 2 ORDER BY DueDate ASC , (p.ListPrice - p.StandardCost) * wo.OrderQty DESC FOR XML PATH('tr'), TYPE ) AS NVARCHAR(MAX) ) + N'</table>'; EXEC msdb.dbo.sp_send_dbmail @profile_name = 'iDevelopment.info Profile' , @recipients = 'dba@idevelopment.info' , @subject = 'Work Order List' , @body = @tableHTML , @body_format = 'HTML'; Go |
Send an E-Mail Message with File Attachment
Database Mail uses the Microsoft Windows security context of the current user to control access to files. Therefore, users who are authenticated with SQL Server Authentication cannot attach files using @file_attachments. Windows does not allow SQL Server to provide credentials from a remote computer to another remote computer. Therefore, Database Mail may not be able to attach files from a network share in cases where the command is run from a computer other than the computer that SQL Server runs on. Attempting to attach files using file_attachments while authenticated with SQL Server Authentication will result in the following error:
Msg 22051, Level 16, State 1, Line 0
The client connection security context could not be impersonated.
Attaching files require an integrated client login
|
The following example demonstrates how to send multiple file attachments. When sending multiple attachments, each file attachment is separated by a semicolon (;). Space are allowed in the file path so long as the semicolon can delimit each path in the list.
USE AppDB Go EXEC msdb.dbo.sp_send_dbmail @profile_name = 'iDevelopment.info Profile' , @recipients = 'dba@idevelopment.info' , @subject = 'Attach Local File' , @body = 'This is a test message to verify that Database Mail can attach multiple files from the local file system.' , @file_attachments = 'U:\MSSQL\Files\linux-logo.png;U:\MSSQL\Files\SQLTestMessage.txt'; Go |
By default, Database Mail limits file attachments to 1 MB per file. Changing this limit, as well as modifying other Database Mail system parameters can be performed using the Database Mail Configuration Wizard. To start the Database Mail Configuration Wizard, inObject Explorer, expand the Management folder in SQL Server Management Studio, right-click Database Mail, and select Configure Database Mail. Select View or change system parameters and click Next to continue.
The file attachment limitation can be modified using the Maximum File Size (Bytes) system parameter. From the Configure System Parameters screen you can also specify types of attachments that you do not want to send out by including the extensions of the files for the Prohibited Attachment File Extensions system parameter.
Configure Email Notification for SQL Server Agent
After completing the setup and testing of Database Mail, you can optionally select it as your mail system for the SQL Server agent to send e-mail notifications. This can be configured by launching SQL Server Management Studio, right-click the SQL Server Agent node in Object Explorer and select Properties.
 |
|
|
SQL Server Agent Properties
|
|
Select the Alert System page in the SQL Server Agent Properties dialog. Check the Enable mail profile option and choose Database Mail in the Mail system pull-down menu. Next, verify the correct Mail profile is selected.
After configuring the alert system, restart the SQL Server Agent service. If you experience any problems sending e-mail notifications through the SQL Server Agent, check the service account that the agent is running under. If the SQL Server Agent is running with one of the built-in accounts like the Local System account, resources outside the SQL Server machine will be unavailable. This includes SMTP mail servers that are on other machines. If this is the case, change the service account for the SQL Server Agent to a domain account to resolve this issue.
Managing Database Mail
How to Start and Stop Database Mail
Use the msdb.dbo.sysmail_stop_sp system procedure to stop Database Mail. This will stop the Service Broker objects that the external program uses. sp_send_dbmail still accepts mail when Database Mail is stopped using sysmail_stop_sp.
EXEC msdb.dbo.sysmail_stop_sp; Go |
To start Database Mail, use msdb.dbo.sysmail_start_sp.
EXEC msdb.dbo.sysmail_start_sp; Go |
The Database Mail External Program is activated when there are e-mail messages to be processed. When there have been no messages to send for the specified time-out period, the program exits. To confirm the Database Mail activation is started, execute the following statement.
EXEC msdb.dbo.sysmail_help_status_sp; Go Status ------- STARTED |
If the Database Mail external program is started, check the status of the mail queue with the following statement:
EXEC msdb.dbo.sysmail_help_queue_sp @queue_type = 'mail'; Go queue_type length state last_empty_rowset_time last_activated_time ---------- ------- ------------------- ----------------------- ----------------------- mail 0 RECEIVES_OCCURRING 2011-04-19 19:41:20.323 2011-04-19 19:40:17.787 |
The mail queue should have the state of RECEIVES_OCCURRING. The status queue may vary from moment to moment. If the mail queue state is not RECEIVES_OCCURRING, try stopping the queue using sysmail_stop_sp and then starting the queue usingsysmail_start_sp.
Archive Database Mail Messages and Event Logs
As mentioned throughout this guide, copies of Database Mail messages and their attachments are retained in msdb tables along with the Database Mail event log. Periodically you might want to reduce the size of the tables and remove messages and events that are no longer needed. The following procedures create a SQL Server Agent job to automate that process.
- The first procedure creates a job named Archive Database Mail with five steps. The job will be run as SQLServerDBA who is the owner of the Database Mail Archive database (DBMailArchive) and has sysadmin privileges.
- The first step copies all messages from the Database Mail tables in msdb to a new table in the Database Mail Archive database and named after the previous month in the format DBMailArchive_Messages_<year_month>. For example:
DBMailArchive.dbo.DBMailArchive_Messages_2011_3 - The second step copies the attachments related to the messages copied in the first step, from the Database Mail tables in msdb to a new table in the Database Mail Archive database and named after the previous month in the formatDBMailArchive_Attachments_<year_month>. For example:
DBMailArchive.dbo.DBMailArchive_Attachments_2011_3 - The third step copies the events from the Database Mail event log that are related to the messages copied in the first step, from the Database Mail tables in msdb to a new table in the Database Mail Archive database and named after the previous month in the format DBMailArchive_Event_Log_<year_month>. For example:
DBMailArchive.dbo.DBMailArchive_Event_Log_2011_3 - The fourth step deletes the records of the transferred mail items from the Database Mail tables in msdb using the msdb.dbo.sysmail_delete_mailitems_sp stored procedure.
- The fifth step deletes the events related to the transferred mail items from the Database Mail event log table in msdb using the msdb.dbo.sysmail_delete_log_sp stored procedure.
- The final procedure schedules the job to run at the start of each month.
For this example, the archive tables will be created in a new database named DBMailArchive owned by SQLServerDBA. The old messages, attachments, and log entries will be moved from the base tables in msdb to the archive tables. When the job completes, an e-mail message will be sent to operators with the status of the run. For production use, you might want to consider more robust error checking. Also, if the archived messages are not required to be stored in a database, they can be exported to a text file, or just deleted.
Create a SQL Server Agent Job
- In Object Explorer, expand SQL Server Agent, right-click Jobs, and then click New Job.
- In the New Job dialog box, in the Name box, type Archive Database Mail.
- In the Owner box, confirm that the job owner is a member of the sysadmin fixed server role. The job owner in this example will be SQLServerDBA who is the owner of the DBMailArchive database and a member of the sysadmin fixed server role.
- In the Category box, click the Database Maintenance.
- In the Description box, type Archive Database Mail messages, and then click Steps.
Create a Step to Archive the Database Mail Messages
- On the Steps page, click New.
- In the Step name box, type Copy Database Mail Items.
- In the Type box, select Transact-SQL script (T-SQL).
- In the Database box, select msdb.
- In the Command box, type the following statement to create a table named after the previous month, containing rows older than the start of the current month:
DECLARE @ArchiveDatabaseName NVARCHAR(30) = 'DBMailArchive';
DECLARE @ArchiveSchemaName NVARCHAR(30) = 'dbo';
DECLARE @LastMonth NVARCHAR(12);
DECLARE @CopyDate NVARCHAR(20);
DECLARE @CreateTable NVARCHAR(250);

SET @LastMonth = (SELECT CAST(DATEPART(yyyy,GETDATE()) AS CHAR(4)) + '_' + CAST(DATEPART(mm,GETDATE())-1 AS VARCHAR(2)));
SET @CopyDate = (SELECT CAST(CONVERT(CHAR(8), CURRENT_TIMESTAMP - DATEPART(dd,GETDATE()-1), 112) AS DATETIME));
SET @CreateTable = 'SELECT * INTO ' + @ArchiveDatabaseName + '.' + @ArchiveSchemaName +
                   '.[' + @ArchiveDatabaseName + '_Messages_' +
                   @LastMonth +
                   '] FROM sysmail_allitems WHERE send_request_date < ''' +
                   @CopyDate +
                   ''';';

EXEC sp_executesql @CreateTable;
- Click OK to save the step.
Create a Step to Archive the Database Mail Attachments
- On the Steps page, click New.
- In the Step name box, type Copy Database Mail Attachments.
- In the Type box, select Transact-SQL script (T-SQL).
- In the Database box, select msdb.
- In the Command box, type the following statement to create an attachments table named after the previous month, containing the attachments that correspond to the messages transferred in the previous step:
DECLARE @ArchiveDatabaseName NVARCHAR(30) = 'DBMailArchive';
DECLARE @ArchiveSchemaName NVARCHAR(30) = 'dbo';
DECLARE @LastMonth NVARCHAR(12);
DECLARE @CopyDate NVARCHAR(20);
DECLARE @CreateTable NVARCHAR(250);

SET @LastMonth = (SELECT CAST(DATEPART(yyyy,GETDATE()) AS CHAR(4)) + '_' + CAST(DATEPART(mm,GETDATE())-1 AS VARCHAR(2)));
SET @CopyDate = (SELECT CAST(CONVERT(CHAR(8), CURRENT_TIMESTAMP - DATEPART(dd,GETDATE()-1), 112) AS DATETIME));
SET @CreateTable = 'SELECT * INTO ' + @ArchiveDatabaseName + '.' + @ArchiveSchemaName +
                   '.[' + @ArchiveDatabaseName + '_Attachments_' +
                   @LastMonth +
                   '] FROM sysmail_attachments WHERE mailitem_id IN (SELECT DISTINCT mailitem_id FROM ' +
                   @ArchiveDatabaseName + '.' + @ArchiveSchemaName + '.[' + @ArchiveDatabaseName + '_Messages_' +
                   @LastMonth +
                   '] )';

EXEC sp_executesql @CreateTable;
- Click OK to save the step.
Create a Step to Archive the Database Mail Log
- On the Steps page, click New.
- In the Step name box, type Copy Database Mail Log.
- In the Type box, select Transact-SQL script (T-SQL).
- In the Database box, select msdb.
- In the Command box, type the following statement to create a log table named after the previous month, containing the log entries that correspond to the messages transferred in the earlier step:
DECLARE @ArchiveDatabaseName NVARCHAR(30) = 'DBMailArchive';
DECLARE @ArchiveSchemaName NVARCHAR(30) = 'dbo';
DECLARE @LastMonth NVARCHAR(12);
DECLARE @CopyDate NVARCHAR(20);
DECLARE @CreateTable NVARCHAR(250);

SET @LastMonth = (SELECT CAST(DATEPART(yyyy,GETDATE()) AS CHAR(4)) + '_' + CAST(DATEPART(mm,GETDATE())-1 AS VARCHAR(2)));
SET @CopyDate = (SELECT CAST(CONVERT(CHAR(8), CURRENT_TIMESTAMP - DATEPART(dd,GETDATE()-1), 112) AS DATETIME));
SET @CreateTable = 'SELECT * INTO ' + @ArchiveDatabaseName + '.' + @ArchiveSchemaName +
                   '.[' + @ArchiveDatabaseName + '_Event_Log_' +
                   @LastMonth +
                   '] FROM sysmail_event_log WHERE mailitem_id IN (SELECT DISTINCT mailitem_id FROM ' +
                   @ArchiveDatabaseName + '.' + @ArchiveSchemaName + '.[' + @ArchiveDatabaseName + '_Messages_' +
                   @LastMonth +
                   '] )';

EXEC sp_executesql @CreateTable;
- Click OK to save the step.
Create a Step to Remove the Archived Rows from Database Mail
- On the Steps page, click New.
- In the Step name box, type Remove Rows from Database Mail.
- In the Type box, select Transact-SQL script (T-SQL).
- In the Database box, select msdb.
- In the Command box, type the following statement to remove rows older than the current month from the Database Mail tables:
DECLARE @CopyDate NVARCHAR(20);

SET @CopyDate = (SELECT CAST(CONVERT(CHAR(8), CURRENT_TIMESTAMP - DATEPART(dd,GETDATE()-1), 112) AS DATETIME));

EXEC msdb.dbo.sysmail_delete_mailitems_sp @sent_before = @CopyDate;
- Click OK to save the step.
Create a Step to Remove the Archived Items from Database Mail Event Log
- On the Steps page, click New.
- In the Step name box, type Remove Rows from Database Mail Event Log.
- In the Type box, select Transact-SQL script (T-SQL).
- In the Database box, select msdb.
- In the Command box, type the following statement to remove rows older than the current month from the Database Mail event log:
DECLARE @CopyDate NVARCHAR(20);

SET @CopyDate = (SELECT CAST(CONVERT(CHAR(8), CURRENT_TIMESTAMP - DATEPART(dd,GETDATE()-1), 112) AS DATETIME));

EXEC msdb.dbo.sysmail_delete_log_sp @logged_before = @CopyDate;
- Click OK to save the step.
Schedule the Job to Run at the Start of Each Month
- In the New Job dialog box, click Schedules.
- On the Schedules page, click New.
- In the Name box, type Archive Database Mail.
- In the Schedule type box, select Recurring.
- In the Frequency area, select the options to run the job on the first day of every month.
- In the Daily frequency area, select Occurs once at 3:00:00 AM.
- Verify that the other options are configured as you wish, and then click OK to save the schedule.
- Click OK to save the job.
Configurar Database Mail en SQL Server 2008 R2
Continuando con la serie de artículos sobre Database Mail en SQL Server 2008 R2, en esta ocasión vamos a tratar la configuración de Database Mail, utilizando para ello una instalación en Cluster de SQL Server 2008 R2 sobre un Failover Cluster Windows Server 2008 R2. Empezamos.
Configurar Database Mail en SQL Server 2008 R2Es posible configurar Database Mail por comandos o con la interfaz gráfica (SSMS). En nuestro caso de ejemplo, vamos a realizar desde cero la configuración de Database Mail en un Cluster de SQL Server 2008 R2 utilizando SQL Server Management Studio (SSMS). Para empezar, utilizaremos la opción Configure Database Mail desde el menú contextual de Database Mail, como se muestra en la siguiente pantalla capturada. 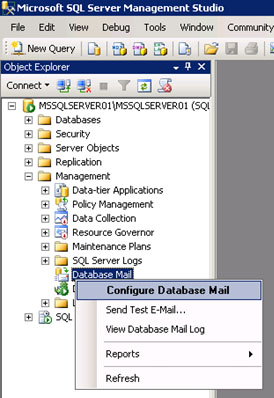 En la pantalla de bienvenida del asistente de configuración de Database Mail, click en Next para continuar. 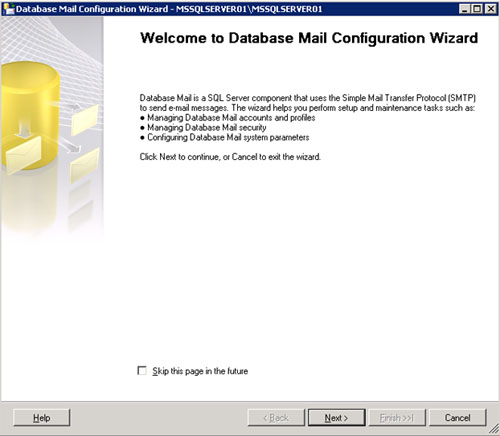 En la pantalla Select Configuration Task, seleccionaremos la opción Set up Database Mail by performing the following tasks. Click Next para continuar. 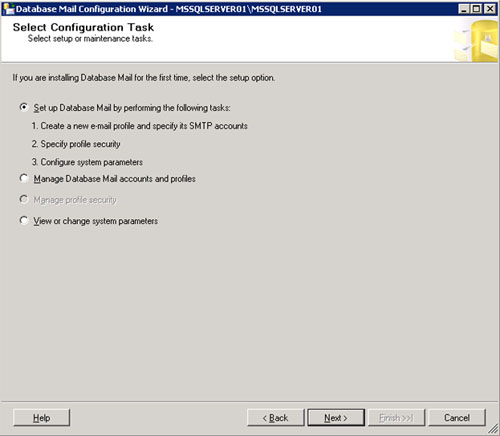 Si aún no estaba habilitado el Database Mail en nuestra instancia de SQL Server (como es nuestro caso), se mostrará un diálogo como el siguiente, preguntando si deseamos habilitar Database Mail. Click Yes para continuar.  En la pantalla New Profile, crearemos un nuevo perfil de Database Mail especificando un nombre y descripción. Seguidamente, click Add para añadir una cuenta de correo al perfil que estamos creando. Téngase en cuenta, que podemos crear múltiples cuentas de correo, y ordenarlas según deseemos que sean utilizadas. De este modo, si se produce un error al enviar un correo electrónico utilizando una cuenta, se podrá intentar automáticamente utilizando la siguiente cuenta de la lista. 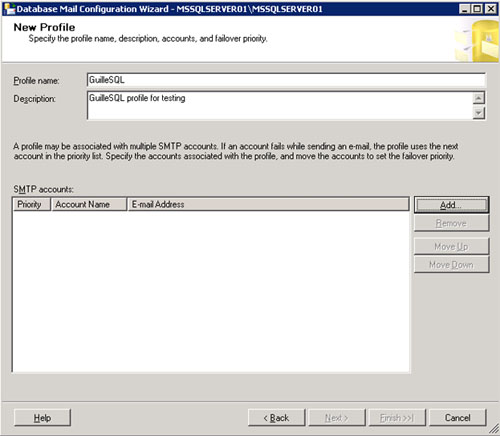 En la pantalla New Database Mail Account configuraremos una cuenta de correo electrónico para ser utilizada por Database Mail. En resumidas cuentas, se trata de indicar la cuenta de correo electrónico, el servidor SMTP, y la configuración de autenticación del servidor SMTP. Click OK para continuar. 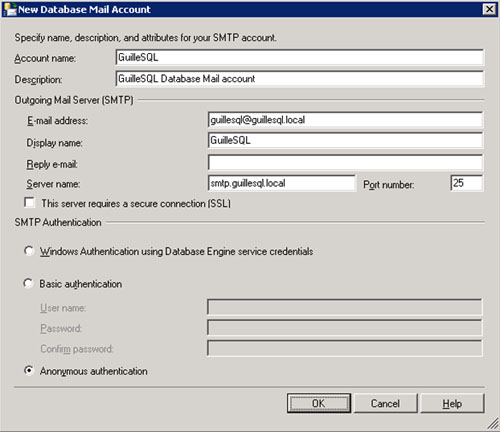 De nuevo en la pantalla New Profile, tenemos la oportunidad de añadir más cuentas de correo electrónico (si lo deseamos) al perfil que estamos configurando. En caso contrario, click Next para continuar. 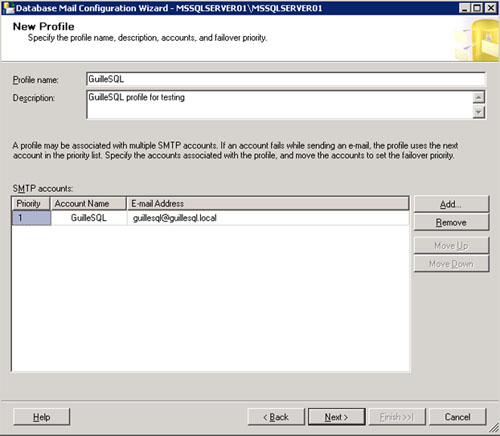 Llegamos a la pantalla Manage Profile Security. Cada perfil de Database Mail, puede ser configurado como público (puede ser utilizado por cualquier usuario) o como privado (sólo puede ser utilizado por el usuario designado). En ambos casos, el perfil puede configurarse como perfil por defecto, de tal modo que sea el perfil utilizado excepto que se indique lo contrario. En nuestro caso de ejemplo, marcamos el perfil que estamos creado, como público y como predeterminado, en la pestaña Public Profiles. 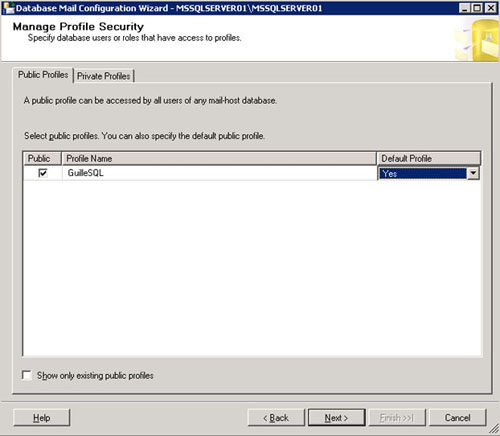 Aprovechamos para mostrar la pestaña Private Profiles, aunque en nuestro caso, no realizaremos ninguna configuración aquí. Click Next para continuar. 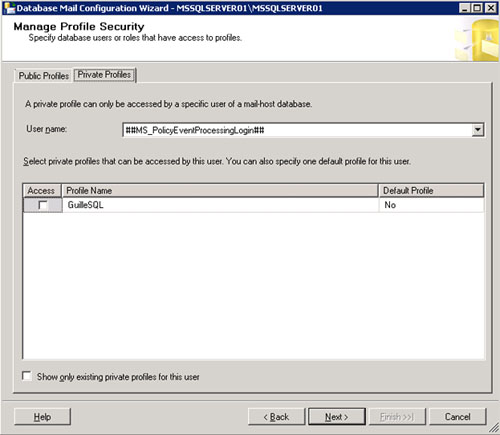 En la pantalla Configure System Parameters podemos configurar varias opciones de configuración globales de Database Mail que pueden resultarnos de gran utilidad (Account Retry Attempts, Account Retry Delay, Maximum File Size, Prohibited Attachment File Extensions, Database Mail Executable Minimum Lifetime, Logging Level). Click Next para continuar. 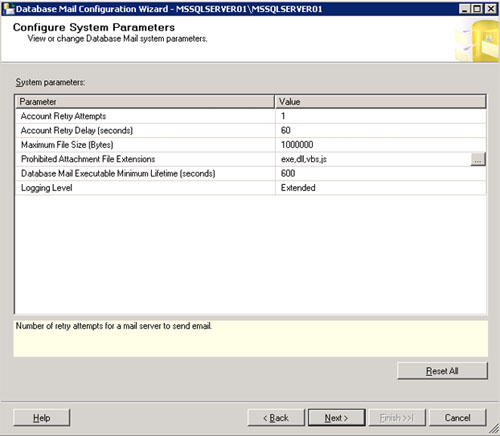 En la pantalla Complete the Wizard, revisamos el resumen de la configuración que vamos a realizar, y si estamos de acuerdo click en Finish para continuar. 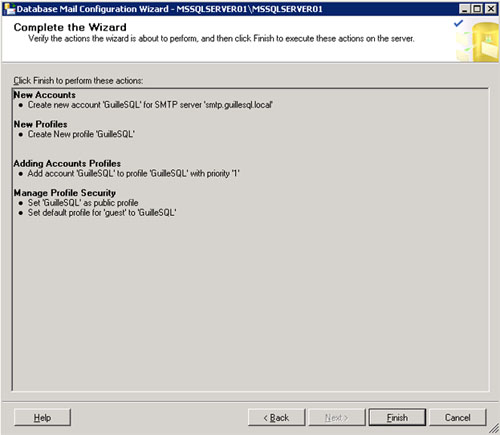 En unos instantes la configuración de Database Mail habrá finalizado satisfactoriamente en nuestro Cluster de SQL Server 2008 R2. Click Close. 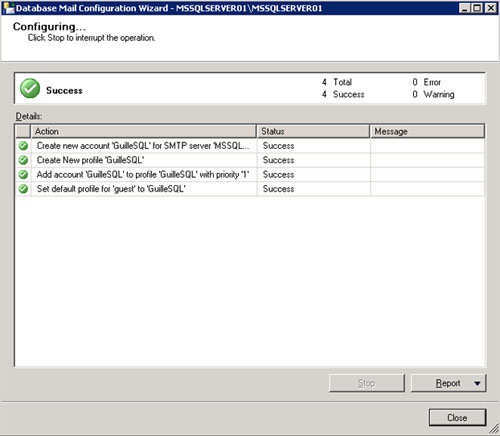 Realizado esto, ya tendremos inicialmente configurado Database Mail. Sin embargo, lo más probable, es que necesitemos realizar alguna configuración adicional, como por ejemplo, crear perfiles de Database Mail adicionales. Modificar la configuración de Database Mail en SQL Server 2008 R2Una vez que hemos finalizado la configuración inicial de Database Mail, muy probablemente tendremos que realizar alguna configuración posterior, ya sea para configurar más perfiles de Database Mail, o bien más adelante para modificar los perfiles existente, cambiar las configuraciones globales de Database Mail, etc. A continuación, vamos a mostrar la forma de modificar la configuración de Database Mail en SQL Server 2008 R2 utilizando SQL Server Management Studio (también se podría realizar con TSQL). Para ello, utilizaremos la opciónConfigure Database Mail desde el menú contextual de Database Mail, como se muestra en la siguiente pantalla capturada.  En la pantalla de bienvenida del asistente de configuración de Database Mail, click Next para continuar.  En la pantalla Select Configuration Task, seleccionaremos la opción que necesitemos en función de la configuración que tengamos que realizar. Click Next para continuar. 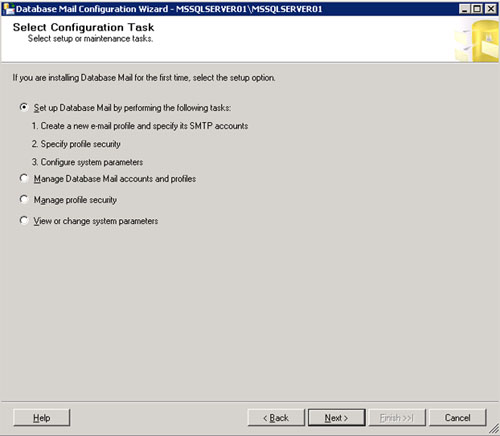 En función de la opción que hayamos seleccionado en la pantalla anterior, se mostrará una u otra pantalla. En todos los casos, se trata de pantallas similares a las que ya vimos en la configuración inicial del Database Mail, por lo que no perderemos tiempo en repetirlo (es más de lo mismo). Hasta aquí llega el presente artículo, sobre cómo configurar Database Mail sobre SQL Server 2008 R2 (en particular, sobre un Cluster de SQL Server 2008 R2). Próximamente, aprovecharemos para hablar sobre cómo utilizar Database Mail en SQL Server 2008 R2. Poco más por hoy. Como siempre, confío que la lectura resulte de interés.
|
ememail
[Fecha del Artículo (UTC): 04/12/2011]
[Autor: GuilleSQL]
Listar todas las tablas de una BD con el recuento de filas
SELECT SCHEMA_NAME(A.schema_id) + ‘.’ +
A.NAME AS ‘Tabla’, SUM(B.rows) AS ‘RowCount’
FROM sys.objects A
INNER JOIN sys.partitions B ON A.object_id = B.object_id
WHERE A.type = ‘U’
GROUP BY A.schema_id, A.Name
GO


